Contents
- Introduction
- What Is An Abstract Syntax Tree?
- Creating Your Own Abstract Syntax Trees
- Manipulating The Tree
- Abstract Syntax Tree Back To Code
- Final Product
- Comments
- Final Thoughts
Introduction
This tutorial intends to teach you how to create, manipulate and generate source code all using Abstract Syntax Trees.
In this tutorial we will be covering the following:
- The basics of what an Abstract Syntax Tree is
- How to create one using the Acorn parser
- How to write a simple traversal algorithm to manipulate certain parts of the tree
- Show you how to turn your modified tree back into JavaScript source code
Throughout this tutorial I am going to be using JavaScript with Node.js. I will be assuming the reader has a basic knowledge of these tools and understands basic programming principles, if not there is a great tutorial here to learn the basics before starting.
What is an Abstract Syntax Tree?
An Abstract Syntax Tree is a representation of source code that keeps the structure of the code free from the strict syntax of programming languages. Some of the uses of ASTs can be seen below:
- Transpilers - a tool to translate code between programming languages
- In compilers to represent the structure of the code
- Clone detection within source code

Abstract Syntax Trees contain nodes, these nodes represent various constructs that appear within source code, such as variables, functions, and conditional statements. In an AST a node contains at least its type, some nodes contain additional properties such as a list of arguments or a body definition. Generally ASTs will be stored in JSON for readability.
let number = 100;
The above JavaScript code represented as an Abstract Syntax Tree in JSON is seen below.
                                {
"type": "Program",
"start": 0,
"end": 17,
"body": [
  {
    "type": "VariableDeclaration",
    "start": 0,
    "end": 17,
    "declarations": [
      {
        "type": "VariableDeclarator",
        "start": 4,
        "end": 16,
        "id": {
          "type": "Identifier",
          "start": 4,
          "end": 10,
          "name": "number"
        },
        "init": {
          "type": "Literal",
          "start": 13,
          "end": 16,
          "value": 100,
          "raw": "100"
        }
      }
    ],
    "kind": "let"
  }
],
"sourceType": "module"
}
As we can see the first node within the tree is of type "Program"
this just indicates that this is the start of a new source code file. If we look at the array "body", this contains all nodes
within source code. Each node is represented as an object within JSON. As you can see our "body" only contains one node
and it is of type "VariableDeclaration". As the name implies this node represents the declaration of a new variable.
The array "declarations" can contain multiple "VariableDeclarator" nodes. These nodes specify the variable name or "id"
and the initialization "value" if one is given. In our example we can see the "id" is an object of type "Identifier",
this means it represents a name to be referenced throughout the code, in our case it is given the "name" "number". If we
look back to our original source code we can see this is the name we gave our variable. The "VariableDeclarator" also has a type
"init" showing what the variable "number" is to be initialized to. Here our "init" object is of type "Literal", meaning it
represents an actual value, here we have a "value" of 100.
If you are wondering how we know what each node means, it is because we are following the ESTree specification. This is a specification that describes how JavaScript code should be represented within an Abstract Syntax Tree. Unfortunately there is no universal AST format, most languages have their own specification as to how code should be represented. We will be sticking with ESTree for this tutorial, as it is well documented.
Creating Your Own Abstract Syntax Trees
We are now going to explore how you can produce your own Abstract Syntax Tree from source code. This process involves using a parser, you may be asking what is a parser, simply put a parser analyses a string of text that conforms to a certain set of grammar rules. The parser will then produce an Abstract Syntax Tree based on the symbols it finds within the string of text entered.
We are not going to be writing our own parser but rather using one that already exists. As mentioned earlier we will be using the acorn parser. This is a great open source parser for converting JavaScript code into the ESTree format.
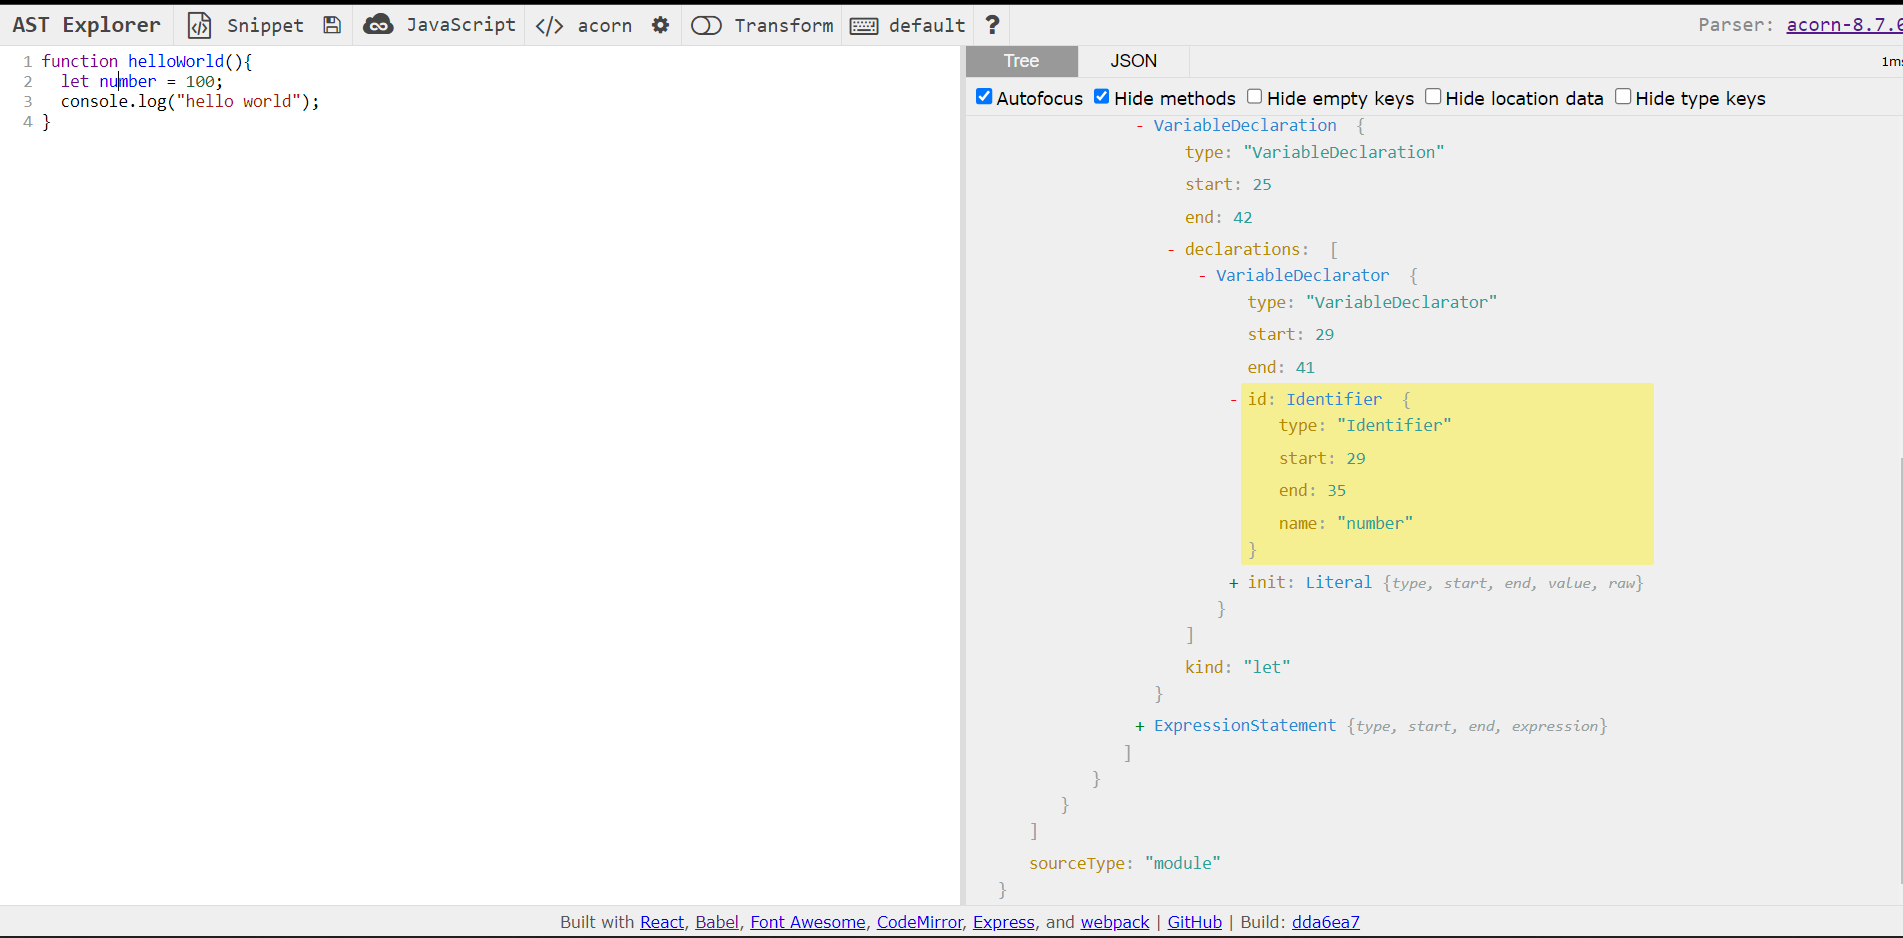
If you are just looking to play about with Abstract Syntax Trees, then AST explorer is a great site to experiment with. It allows you to input source code and see the output AST next to it in a variety of different languages.
To get started with acorn you will need Node.JS installed, if you don't have it installed you can get it here. If you don't want to download Node.JS I have created a simple code pen which can be found here. Alternatively there is an an embedded version which can be found at the bottom of the Final Product section.
Open a new terminal on your respective system and run npm install acorn in your project directory. This will download and install the acorn package.
Also download and install estree-util-to-js using npm install estree-util-to-js. This package is used to turn our Abstract Syntax Trees back into JavaScript source code, but we will not need this till later.
As the estree-util-to-js is ESM only, then we will need to set our script type using "type" : "module" within our package.json file.
Your package.json should look similar to the following:
{
  "dependencies": {
    "acorn": "^8.8.2",
    "estree-util-to-js": "^1.1.1"
  },
  "type" : "module"
}
Now create a new file called AST_Example.js within your project directory.
We first want to import the acorn module:
import * as acorn from "acorn";
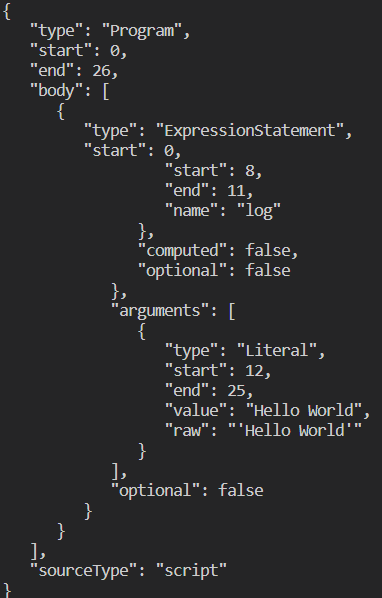
Next we want to define some code to parse into an Abstract Syntax Tree. Do this just define a string with the code you want to parse.
let sourceCode = "console.log('Hello World')";
Now to actually parse the code call the acorn parser. The parser method takes two parameters, the first being a string of source code and the second being an object containing parsing options. We must provide at least one option specifying the ECMAScript version, for now just use 2022 as the version. A full list of options can be found on the acorn github page. The parse method will return an Abstract Syntax Tree in the form of an object we can assign to a variable.
// assign the AST object to the variable tree
let tree = acorn.parse(sourceCode, {ecmaVersion : 2022});
We can now convert our Abstract Syntax Tree into JSON to view it more clearly.
// convert the tree object into JSON using JSON.stringify
let jsonTree = JSON.stringify(tree, null, 3);
Finally we can print out the Abstract Syntax Tree in its JSON format.
// print the JSON format of the AST
console.log(jsonTree);
The complete code can be seen below:
import * as acorn from "acorn";

let sourceCode = "console.log('Hello World')";

// assign the AST object to the variable tree
let tree = acorn.parse(sourceCode, {ecmaVersion : 2022});

// convert the tree object into JSON using JSON.stringify
let jsonTree = JSON.stringify(tree, null, 3);

// print the JSON format of the AST
console.log(jsonTree);
To run this example open a terminal and navigate to your project directory then run node AST_Example.js. You should see your Abstract Syntax Tree output as JSON below.
Congratulations you have just created your first Abstract Syntax Tree using JavaScript, try to change the input code and see how the output tree changes. Next we will be exploring how to traverse your tree and do some very basic manipulation.
Manipulating The Tree
To manipulate our Abstract Syntax Tree we first must understand how to traverse it. Traversal simply means visiting every node possible.
To do this we will use a depth first search algorithm. This algorithm works by starting at the root node (top node if represented as a tree) and travels as far down a branch as possible before backtracking and doing the same for the next branch.
A good animation of how a depth first search works is shown below.

To start to implement a depth first search for our Abstract Syntax Tree we need to define a function we can use with one parameter node. This will be the current node we are on in the tree.
function traverse(node){

}
After that we want to get an array with all the keys of the current node
function traverse(node){
    // keys is an array containing our object keys as strings
    // an example of a key in one of our nodes is "type"
    const keys = Object.keys(node);
}
Now if we think each node can have more one key, such as "type"
or "name". These keys contain a single value, but some nodes such as
a "VariableDeclarator" from our example above contain keys that hold another node.
A node that is contained within another node is called a child of that node.
So what we will do is loop through all the keys from a node and check if any of them contain another node.
At this stage you may also be thinking some keys hold an array such as a "declarations"
key. If this is the case then we just need to loop through all the nodes within the array.
Our traverse function now looks this:
function traverse(node){
    const child = node[keys[i]];

    for (let i = 0; i < keys.length; i++){
        const child = node[keys[i]];

        if (Array.isArray(child)){
            for (let j = 0; j < child.length; j++){
                // we are visiting each node in the array here
            }
        }
        // this isNode function is explained below
        else if (isNode(child)){
        }
    }
}
Looking at the code above there is a function called isNode(node).
This function simply just checks if a child property of a node relates to another node.
function isNode(node){
    if (typeof node === "object" && node !== null)
        return true;
    else
        return false;
}
As can be seen it simply just checks if the node is of type "object" as all nodes are just objects.
This is good, now we have a function that can determine if a key is a node or an array, and act accordingly. But we have a problem that only the root node of the tree will be visited. To fix this we must use recursion. When we obtain a valid node we will call the traverse function from within itself, this allows to visit every node in the tree.
To do this add the following calls to the traverse function below.
function traverse(node){
    const keys = Object.keys(node);

    for (let i = 0; i < keys.length; i++){
        const child = node[keys[i]];

        if (Array.isArray(child)){
            for (let j = 0; j < child.length; j++){
                // we add a call here to visit every node in the array
                traverse(child[j]);
            }
        }
        else if (isNode(child)){
            // if a key relates to a node then we will visit the child
            traverse(child)
        }
    }
}
As you can see the traverse function is called with a child node, this means every single node in the tree will be visited once hence achieving our goal of a depth first search.
To actually manipulate our tree we could just add some logic at the start of our traverse function like below.
function traverse(node){
    // do some manipulation here
    // add some logic for selecting nodes

    const keys = Object.keys(node);

    for (let i = 0; i < keys.length; i++){
        const child = node[keys[i]];

        if (Array.isArray(child)){
            for (let j = 0; j < child.length; j++){
                traverse(child[j]);
            }
        }
        else if (isNode(child)){
            traverse(child)
        }
    }
}
Adding logic directly into our traverse could get very messy quickly, it also limits our function from being reused with different logic without rewriting it. Instead we will use a callback method to carry out our manipulation. This will be passed into the traverse function when first called and will be run at the start of the function.
function traverse(node, parent, callback){
    // we add our callback function here
    callback(node, parent);

    const keys = Object.keys(node);

    for (let i = 0; i < keys.length; i++){
        const child = node[keys[i]];

        if (Array.isArray(child)){
            for (let j = 0; j < child.length; j++){
                // we are also adding the callback to the traverse call here
                traverse(child[j], node, callback);
            }
        }
        else if (isNode(child)){
            // we have added the callback function to this
            // traverse call as well
            traverse(child, node, callback)
        }
    }
}
A lot is going on above so I will break it down. First, in the function definition for traverse we have added
parent and callback, parent is the node above the one we are currently visiting,
callback is a definition for the function to
be run when callback is called in our traverse function.
Next in the call to traverse with the children we have added node and callback
. node is being passed as the parent, as when we call traverse with the children
the current node becomes the parent. callback is just the function definition passed to the next call so it can be run again.
So now we have a way to manipulate the tree, I will show you an example of how this can be used. Imagine we have a simple program as below:
function add(){
    let y = 10;
    let sum = x + x;
}
Say we wanted to change all the x variables to y,
to do this we need to locate all the "Identifier" nodes that have a "name"
of x, we can then change these to y.
An example of such a callback function can be seen below.
function manipulateTree(node, parent){
    if (node.type === "Identifier"){
        if (node.name === "x"){
            node.name = "y";
        }
    }
}
Finally we need to call the traverse function with this new callback function defined.
traverse(tree, null, manipulateTree);
null in this call is for the parent, since we are calling the traverse function with the root node
then it will have no parent.
The full code for this section can be seen below.
function traverse(node, parent, callBack){
    callBack(node, parent);

    const keys = Object.keys(node);

    for (let i = 0; i < keys.length; i++){
        const child = node[keys[i]];

        if (Array.isArray(child)){
            for (let j = 0; j < child.length; j++){
                traverse(child[j], node, callBack);
            }
        }
        else if (isNode(child)){
            traverse(child, node, callBack)
        }
    }
}

function isNode(node){
    if (typeof node === "object" && node !== null)
        return true;
    else
        return false;
}

function manipulateTree(node, parent){
    if (node.type === "Identifier"){
        if (node.name === "x"){
            node.name = "y";
        }
    }
}

traverse(tree, null, manipulateTree);
Abstract Syntax Tree Back To Code
Now that we have our modified Abstract Syntax Tree we will convert it back into JavaScript. To do this we will be using a tool called estree-util-to-js. I mentioned this tool above and indicated how to install it and set up our project correctly.
To start we first need to import the library, this can be done like below.
import {toJs} from "estree-util-to-js";
To use this library we simply need to call one function, toJs with one parameter,
which will be our Abstract Syntax Tree. This will return an object, to access the source code as a string we simply
get the value property.
let modifiedCode = toJs(tree);
console.log(modifiedCode.value);
Final Product
Now that we have covered all the aspects of manipulating an Abstract Syntax Tree using JavaScript, we can stick all the parts together to have a functioning program.
import * as acorn from "acorn";
import {toJs} from "estree-util-to-js";

function traverse(node, parent, callBack){
    callBack(node, parent);

    const keys = Object.keys(node);

    for (let i = 0; i < keys.length; i++){
        const child = node[keys[i]];

        if (Array.isArray(child)){
            for (let j = 0; j < child.length; j++){
                traverse(child[j], node, callBack);
            }
        }
        else if (isNode(child)){
            traverse(child, node, callBack)
        }
    }
}

function isNode(node){
    if (typeof node === "object" && node !== null)
        return true;
    else
        return false;
}

function manipulateTree(node, parent){
    if (node.type === "Identifier"){
        if (node.name === "x"){
            node.name = "y";
        }
    }
}

let sourceCode = `function add(){
    let y = 10;
    let sum = x + x;
}`;

console.log("Code before manipulation:");
console.log(sourceCode);
console.log();

let tree = acorn.parse(sourceCode, {ecmaVersion : 2022});

let jsonTree = JSON.stringify(tree, null, 3);

traverse(tree, null, manipulateTree);

let modifiedCode = toJs(tree);

console.log("After manipulation:");
console.log(modifiedCode.value);
If we run this program it will show us how the code looks before manipulation and after. Looking at the output below you can see we have achieved our goal of converting the x Identifiers into a y.
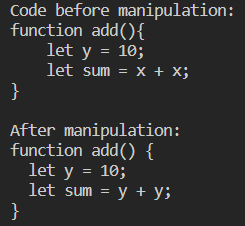
If you are unable to run this code don't worry you can use the provided code pen below that shows the example working:
See the Pen AST Example by Jack (@DogRacer) on CodePen.
Comments
If you spent some time reading the estree documentation you may have noticed that there is no support for comments. This is because comments are not part of the program so when the acorn parser parses the code it ignores them. This can be annoying if we want to perform some sort of manipulation on our code and we want to keep the comments. Luckily it is not too difficult to add support for comments. Keep reading below to find out how.
To add support for comments we first need to examine how to get the acorn parser to recognize them. To do this we use an
alias for comments. I have decided to go with the syntax __COMMENT__("Comment"). This a simple syntax to understand,
and is easy to locate in our AST. When we parse the code this new comment block will be recognized as a function call, we can then manipulate it
to produce the appropriate comments.
To do this we will borrow our traverse and isNode functions from above. We will use this to traverse the AST and look for our
new comment alias. If you are creating a new project you will need to follow the process to convert it to a module. We can reuse the above code but
with a few changes. The first change is to define a new source code string.
let sourceCode = `__COMMENT__("Print Hello world to the user")
console.log("Hello world");`;
As you can see have added a comment to our code but are using the alias we defined earlier. Next we need to modify the callback method we supply to the
traverse function.
function manipulateComment(node, parent){

}
We have defined a new function that will deal with the manipulation logic for our comments. Don't forget to add this to the traverse call.
traverse(tree, null, manipulateComment);
Now we need to add some logic to our new function. We will start by checking if the node is a function call. If it is we will check if the name of the function is
__COMMENT__.
function manipulateComment(node, parent){
    if(isComment(node)){
        // Manipulate comment
    }
}
The new function isComment is a simple function that checks if the node is a function call and if
the name of the function is __COMMENT__. It also needs to check if our comment alias contains only
one argument and that the argument is only of type literal. Remember a literal represents an actual value rather than a variable name.
function isComment(node){
    if (node.type === "CallExpression"){
        if (node.callee.name === "__COMMENT__"){
            // check there is only one argument
            if (node.arguments.length !== 1)
                return false;

            // check the argument is a string
            if (node.arguments[0].type !== "Literal")
                return false;

            return true;
        }
    }
    return false;
}
Now that we have established if the node is a comment alias we can begin to manipulate it. The manipulation required for this is a bit more complex than the previous examples.
function manipulateComment(node, parent){
    if(isComment(node)){
        let commentNode = createComment(node);
    }
}
The new function createComment will be responsible for creating the comment node. We first need to
obtain the text from the node, this will be the first argument of the function call. We can then create a new comment node. To do that
we will create an identifier node. The name of the identifier will contain a comment string.
We have to use an identifier because if were to just use a literal node the comment would be removed. When using an identifier the compiler
library believes this is a variable and will then not remove it.
function createComment(node){
    // get the comment text
    let commentText = node.arguments[0].value;
    // create the comment string
    let comment = `/*${commentText}*/`;

    let commentNode =
    {
        type : "Identifier",
        name : comment
    }

    return commentNode;
}
Now that we have our new comment node we need to replace the comment alias with the new comment node. We can do this by replacing the call expression that is already there with the comment node. To do this we can simply change the type of our node to an identifier and set the name to the comment string. We also need to delete the arguments property and the callee property.
function manipulateComment(node, parent){
    if(isComment(node)){
        let commentNode = createComment(node);

        // delete the call expression node
        delete node.callee;
        delete node.arguments;

        // replace the call expression node with the comment node
        node.name = commentNode.name;
        node.type = commentNode.type;
    }
}
That is all the code required to include comments within our code. The full code used can be seen below:
import * as acorn from "acorn";
import {toJs} from "estree-util-to-js";

function traverse(node, parent, callBack){
    callBack(node, parent);

    const keys = Object.keys(node);

    for (let i = 0; i < keys.length; i++){
        const child = node[keys[i]];

        if (Array.isArray(child)){
            for (let j = 0; j < child.length; j++){
                traverse(child[j], node, callBack);
            }
        }
        else if (isNode(child)){
            traverse(child, node, callBack)
        }
    }
}

function isNode(node){
    if (typeof node === "object" && node !== null)
        return true;
    else
        return false;
}

function manipulateComment(node, parent){
    if(isComment(node)){
        let commentNode = createComment(node);

        // delete the call expression node
        delete node.callee;
        delete node.arguments;

        // replace the call expression node with the comment node
        node.name = commentNode.name;
        node.type = commentNode.type;
    }
}

function isComment(node){
    if (node.type === "CallExpression"){
        if (node.callee.name === "__COMMENT__"){
            // check there is only one argument
            if (node.arguments.length !== 1)
                return false;

            // check the argument is a string
            if (node.arguments[0].type !== "Literal")
                return false;

            return true;
        }
    }
    return false;
}

function createComment(node){
    // get the comment text
    let commentText = node.arguments[0].value;
    // create the comment string
    let comment = `/*${commentText}*/`;

    let commentNode =
    {
        type : "Identifier",
        name : comment
    }

    return commentNode;
}

let sourceCode = `__COMMENT__("Print Hello world to the user")
console.log("Hello world");`;

console.log("Code before manipulation:");
console.log(sourceCode);
console.log();

let tree = acorn.parse(sourceCode, {ecmaVersion : 2022});

let jsonTree = JSON.stringify(tree, null, 3);

traverse(tree, null, manipulateComment);

let modifiedCode = toJs(tree);

console.log("After manipulation:");
console.log(modifiedCode.value);
When we run this code we can see the comment has been added to the code after manipulation. This is a very useful feature to use, especially if you are performing some sort of manipulation on the code, and sharing it with others.

Similar to the previous example I have also provided a CodePen to allow those who don't have access to Node.JS to try out the code.
See the Pen Comments Code by Jack (@DogRacer) on CodePen.
Final Thoughts
As you reach the end of this guide you should now be able to create, manipulate and compile Abstract Syntax Trees. This is of course a very simple and brief look at the use for such a powerful concept. A next step could be to do some more advanced manipulation using the parent node. You could even try your hand, at writing a transpiler which uses Abstract Syntax Trees to convert from one programming language to another. There is a good article about this here, it is not a tutorial about how to write a transpiler, but rather an idea of how the problem could be approached.